Category Archives: Seasonal

Creamy tomato garlic bisque

For those of you who haven’t been paying attention to the recent weather reports, a cold snap has hit the Northwest, complete with snow, ice, and the usual crazy Seattlites who can’t drive in snow (or a light rain, for that matter.) We have a blanket of fluffy, crystalline snow all over, and it’s making the trees look like Christmas decorations, two weeks too late.

On the plus side, winter snow brings winter hungers, and I love nothing more than warm, hearty soups. And, since I’ve been dying to try this tomato bisque recipe for a while, I figured this would be a perfect time to try it. And to make things even better, this version of the soup serves two hungry people (or four appetizers) for less than 150 calories per (or 75, if you use it as an appetizer.) It’s light, airy, and full of flavor.

Now, I know you’ll have a few questions about the ingredients, and believe me, they’re all necessary, but, in explanation:

  • The soy and anchovies are for depth of flavor. They’re odd ingredients, I know, but they do worlds of good for the deep, rich flavor of this soup.
  • You can add more cream, or sour cream (M suggested neufchâtel , which I’m quite excited to try) to ramp up the creamy flavor, but this soup does well enough as is.
  • The roasted garlic definitely a win. I felt that it added a very subtle undertone to the soup that worked well.

Pheasant’s tomato bisque

4 beefsteak or heirloom tomatoes

3 roma tomatoes

3 cloves raw garlic

1/2 c finely chopped onion

2 tbsp roasted garlic mash (optional but recommended)

1 anchovy filet

1 tbsp soy sauce (Aloha brand highly suggested)

1 tsp vegetable oil (I used some of the roasted garlic oil)

1/2 c chicken or vegetable broth (optional)

1-3 basil leaves, to preference

1 tbsp ground dried rosemary (measure after grinding)

1 bay leaf

1/8 tsp cayenne

1 tbsp fat free sour cream (for garnish)

Using a paring knife, cut a small X into the bottom of each tomato, and cut the core out of the top. Fill a small (3-5 qt) sauce pot with water and bring it to a boil. While it’s heating, set up an empty bowl on the stove, as well as a bowl filled with cold water and ice cubes. Once the water is boiling, drop the tomatoes in one at a time. Count to fifteen slowly, then take them out with a slotted spoon and place them in the ice bath. You should see the skin beginning to peel off and split from the tomato at this point. After a moment, transfer the tomatoes into the empty bowl.

After each tomato has been boiled and bathed, rub the skin splits and peel the tomatoes. Set them aside. 

Empty the sauce pot of water and place it back on the burner, at medium heat. Add the oil and onion, as well as the rosemary and cayenne. Allow them to sweat and begin to brown. While they cook, mince the raw garlic very finely. Add it, stir, and add in the anchovy filet. Mash the filet to break it up a bit. Turn the burner down to low.

Slice and seed the peeled tomatoes. Seeding is critical here…if you don’t, you’ll have way too much liquid, and those seeds don’t taste very good. Dice them, and add about two tomatoes’ worth to the pot. Turn it up to medium and let that cook down while you dice the remaining tomatoes.

Allow the two diced tomatoes in the pan cook down until a medium fond develops. Deglaze with half the chicken broth and the soy sauce. Then, add the remaining tomatoes, the roasted garlic, basil leaves and the bay leaf. Allow it to simmer for about twenty minutes.

Using a hand blender, blend the soup to a smooth, silken consistency. If you don’t own a hand blender (like we don’t) allow it to cool, then blend in the blender or Magic Bullet.

After you’ve blended it, taste and correct for spices depending on your preferences, then dish it up, top it with sour cream (or cream, or softened cream cheese) and watch it disappear! 

Because of the soft, creamy and sweet tastes that go along with this soup, M and I served it up alongside some best-ever roasted potatoes (recipe to follow) and happily sat down to eat. I must warn you, this soup is soup-er filling (how could I write this entire post without using that pun?!) and one bowl was too much for either of us to handle in one sitting. Considering how I can pack away food…that’s really saying something. Enjoy!

1 Comment

Filed under Seasonal, Soup, Winter

French onion soup

Today, pheasants, was approximately as cold as Washington gets when there’s no snow involved. It was absolutely freezing and I was walking around in a skirt and heels down in the U district, looking for a job.

Coming home, M and I were nothing short of tired and cold, and very hungry. We’d picked up a loaf of my favorite French bread (crusty on the outside, light and fluffy as a dream on the inside) with which to dip, nosh and generally make merriment. This soup is brothy, light and satisfying. The recipe feeds two hungry people, three less hungry people, or four to six as an appetizer. In an effort to make the easiest soup known to man, I present now to you:

Pheasant’s easy onion soup

2 medium yellow onions

2 cloves garlic, minced

1 tsp vegetable oil

1 tsp garlic mash

1 tsp ground, dried rosemary (measure after grinding)

2 tsp soy sauce (Aloha brand highly recommended)

2 c beef broth

2 c water

bay leaf

1/4 c red wine (optional)

salt and pepper to taste

In a soup pot, heat the oil on medium. As it’s heating, slice the onions very finely. Add them to the pan, stirring. Mince the garlic and add it, as well as the garlic mash, rosemary and some pepper. Stir this all together and allow it to sauté for a few minutes until everything starts to wilt and become translucent. 

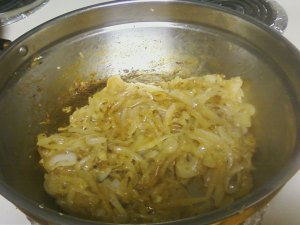
Turn the heat up to medium-high and allow the onions to brown for a while. Once it’s beginning to brown and crisp, turn it back down to medium-low and let it go for 20-30 minutes, checking occasionally to adjust the heat, until the onions have become caramel-colored, soft, and reduced to 1/3 their original size.

Once reduced...voila!

The pan should have a nice, deeply-browned (but not burnt!) fond across the bottom (fond is the fancy French term for that brown crusty stuff on the bottom. And it’s better than gold!)

This is fond. You may now fall to your knees in worship.

Turn the heat up to medium-high. Add the soy sauce and wine to the pan to deglaze, making sure to scrape every last bit of that fond off the bottom. If you aren’t using wine, just use a little water. Once everything is all mixed together nicely, add the bay leaf, beef broth and water, then turn it up to a boil. When it boils, turn it down to a simmer and let it go for about ten minutes, or reduced to 2/3 its original volume.

A little taste-test during the process...

If you like, melt Gruyere cheese over crostini and float in the soup. M and I, however, prefer our French bread dipped into the broth. Enjoy!

Leave a comment

Filed under Autumn, Seasonal, Soup, Winter

Roasted garlic oil

A few weeks ago, my mom dropped by with probably the best gift M has ever received: a bottle of homemade roasted garlic oil. She’d never had it before, so I took the opportunity to serve it up the best way I know how: with a lot of crunchy, thinly-sliced crostini and small sprinkles of sea salt. M went mad. She consumed about half a loaf of bread herself before she caught me giving her that look. It was, however, officially decided that roasted garlic oil needs to be a main staple in our kitchen.

My mother’s garlic oil was given to us in the sweetest little pouring bottle, stoppered in glass. It’s quite beautiful. The golden oil is something like magic, the color of fairy dust and Cinderella’s golden slippers. It tastes and smells as good as it gets, too: lightly perfumed, with just the right amount of sweetness to make a soft sigh imperative.

Unfortunately, our oil as run low of late…we balefully watched as I poured the last bits of oil from our reserve bottle (also thoughtfully provided by my mom) into the little pouring bottle. We sighed with sorrow. I love it lightly drizzled over toast in the morning with a small dash of sea salt…served up with an egg, it’s about the nicest breakfast you can have on a cold day. Or any day, really.

Well, once I’d decided that I needed roasted garlic for those delicious sandwiches I made, I knew that I could put it off no longer: it was officially time to bring out the peanut oil I had in my pantry and get down to business.

But, my little Pheasant bleated, What if it isn’t as good as your mom’s? Oh no. No, nay, never, no nay never, no more…this oil will be the best. Ever. Just as good as mom’s, I said firmly. I nodded and set off to make the greatest garlic oil I’ve ever tasted.

There are SO many ways to use this oil, and it’s really only limited by your imagination. Here are some ways M and I like to use our garlic oil:

  • Drizzled into mashed potatoes for a more subtle garlic kick (paired with mashed roasted garlic, it’s always a winner!)
  • Use it to sauté onions and mushrooms before tossing with pasta
  • Open up a hot baked potato and spoon a bit inside before salting and continuing with your usual toppings (skip the butter.) It adds a great, subtle garlic flavor that kicks everything up a level.
  • Use it in place of olive oil for aioli…come to think of it, sub the roasted garlic for plain in aioli and you’ve got yourself a winner!
  • Use it on little crostini with sea salt…it’s by far our favorite thing to do!

Roasted garlic oil

1-2 large, tight heads of garlic (depending on whether you want just oil, or garlic mash too)

3 tbsp olive oil

2 c peanut, olive or corn oil

 Using the directions for my best-ever roasted garlic, roast your one or two heads. 

Once they are cooked and cooled, pour the 2 cups of your oil of choice into a non-reactive saucepan or small soup pot. Carefully peel every clove of roasted garlic from one head and drop it into the oil. Set the pot on low heat and let it go for 2 to 3 hours, checking every so often to make sure it isn’t simmering. A few small bubbles here and there are fine, but nothing big. Once done, take it off the heat and leave it to cool.

If you’re making two heads for garlic mash, take the cloves from the second head and smash them all in a small jar. Cover and place it in the fridge.

Garlic mash made easy!

After you’ve let the oil cool, scoop out all the garlic from it and place them into the small jar along with your garlic mash. Place oil in the jar just until it covers all the garlic; replace in the fridge.

In a small glass jar with a lid, or some kind of cap (ours is just like a tiny doorknob with a silicone cap on the bottom for a seal) pour your oil. Pour any excess into a glass bottle (either recycled or new, it doesn’t matter as long as it seals.)

Both bottles will keep in the pantry for about three months. Granted, ours never lasts so long. Keep the garlic mash refrigerated well, and use it for antipasto, in garlic mash potatoes, as a flavoring in tomato and cream sauces, or anything else you like!

2 Comments

Filed under Sauces and condiments, Seasonal, Summer

Mushroom soup!

Now, isn't that pretty?

I really hate heavy meals sometimes. There are just some times where a heavy meal packed with butter and calories isn’t going to cut it. That’s why I invented this delightful(ly light!) yet filling mushroom soup: for those nights when something light and beautiful is called for.

When I realized that I needed something light, yet filling and delicious, I couldn’t help but reach for mushrooms. They’re meaty and tender, yet light and airy. With a few tweaks to the usually butter- and cream-laden creamy mushroom soup recipes littering the internet, I came up with a creamy yet not cream-filled recipe for mushroom soup. It goes absolutely stunningly with some baguette slices topped with broiled Parmesan, or a little swirl of cream to fill out the flavors.

Pheasant’s Creamy Mushroom Soup

6 medium-large Crimini mushrooms OR 2 medium Portobellos, diced

6 button mushrooms, diced

1 rib of celery, sliced thinly

1/4 boiled, peeled potato (optional), diced

1/4 small yellow onion, diced finely

3 garlic cloves, peeled and minced

4 large walnut halves, minced

3 tbsp soy sauce (Aloha brand highly suggested)

4 1/2 c hot (near boiling) beef broth


In a small soup pot, saute the celery, potato if you’re using it, onion, garlic and walnut together. When the onion and celery are beginning to brown, move everything to a food processor. In the same pot, add all the mushrooms and saute until golden and wilted. Add those as well to the food processor. Start the food processor on low and process the entire mass until smooth and thick. While the processor is running, add the soy sauce.

Transfer the final, smooth blend to the original soup pot. Set the burner to medium and add in the beef broth slowly, stirring to combine. Taste and adjust for spices.

M liked this soup…granted, she preferred it once I’d added at least a half cup of cream and a tablespoon or so of butter to her bowl. She really likes her creamy goodness. For the rest of us, though, a nice swirl of heavy cream on top after the soup is dished up will do just fine. And, ah, a few drops of truffle oil never hurt it, either…enjoy!

Leave a comment

Filed under Autumn, Seasonal, Soup

Pumpkin-oat Breakfast Brûlée (ramekins, part III)

Last night was full of nice things, pheasants, but it was also full of Thai food. Now, don’t get me wrong, I love Thai food. I love it a little too much, if you know what I mean. And after nights of indulging like that, I enjoy nothing more than waking up and preparing a breakfast that is filling, light in calories, and simple, both in flavor and preparation.

With that in mind, I woke up and stared at the surplus of baked pumpkin we have sitting around and decided to whip up some pumpkin oat cakes, with a little touch of brûlée. It’s tasty, good for you, and fun to make! Little kids will love this recipe, I’m sure, topped with a little maple syrup and cream. Served as a dessert with some of my special hot cocoa (recipe to come) it would also make for a great dessert!

Pheasant’s Pumpkin-Oat Breakfast Brûlée

1 c pumpkin puree

4 tbsp oats, divided

butter to coat

1/2 tsp sugar

In a food processor or spice grinder, grind the dried oats until they form a flour. Lightly butter two ramekins and, using about 1/4 of the oat flour, dust them to coat. Move the remaining flour to a bowl and mix in the pumpkin puree. Divide the mixture bewteen the ramekins to bake, at 350°F (177°C) for 10 minutes.

Once the cakes are done, sprinkle sugar over the cakes and, using a brûlée torch or your broiler, melt the sugar until a thin crust forms. Let cool, and enjoy!

Leave a comment

Filed under Autumn, Baking, Pastas, grains and oatmeal, Seasonal

Lemon-dill sole and cucumber salad

I apologize for the white on white...I keep telling M we need colored plates!

I love Mediterranean food. Then again, if you know me in person, you probably know that I love every kind of food. But, Mediterranean holds a special place in my heart. I love the fresh, bright, wholesome flavors. And of course, I love the ease of preparation and low fat generally found in Mediterranean cooking.

Whenever I have a need for something fast, healthy and simple, I almost invariably head for Greek or Italian cuisine. It’s simple, satisfying, and oh, so delicious. And lately, I’ve been working harder than usual. Yay for the holidays! Boo for the holiday shopping rushes! So, tonight, I present to you my baked sole, covered in a creamy lemon, dill and pepper sauce. I served it up alongside some delicious cucumber salad and quinoa.

I first had this cucumber salad while staying with my aunt C and her family down in California, about two years ago. It was amazing…I remember she cooked up some grilled chicken, fragrant, delicious rice pilaf and served it up alongside roasted tomatoes, and this cucumber salad. I was in love at first bite. Well, who am I kidding? I was practically head over heels just going off smell alone. It was heavenly. I’d never had anything so simple, yet so beautiful. And that, pheasants, is why I am passing this beautiful side dish along to you. It’s great on its own, or on sandwiches, with rice, or in a gyro. You can make it creamier or less so, depending on your tastes.

Lemon Dill Sole

4 medium to large sole fillets

20 large, multicolored peppercorns (or more or less, depending on how peppery you like it)

2 tbsp dried dill

1/2 tbsp sea salt

1 large, rolled lemon (and zested)

1 tbsp fat free sour cream (or yogurt)

1/4 tsp sugar

Preheat your oven to 350°F (177° C) and line a jelly roll pan with foil. Spray the foil with Pam, and lay out your fillets. Crush 15 of the peppercorns in a mortar, adding in 1 1/4 tablespoons of the dill and half the sea salt. Mix it all together, then sprinkle lightly and evenly over your fillets until the mix is gone. Zest half the lemon, sprinkling the zest over the fillets. Then, cut the lemon in half and squeeze a few tablespoons over the fillets. Place in the oven for ten to thirteen minutes.

While the fish is cooking, take out a small saucepan and put it on medium. Add all the remaining lemon juice and the other half of the lemon’s zest. Add 1/2 the salt left, the sugar, remaining dill, and sour cream. Bring it all to a simmer until thickened. Taste and correct for spices, then set aside to thicken further. I made ours sweeter, because M doesn’t like the bite of lemon.

Once the timer goes off, take the fillets from the oven and set them somewhere to rest for a moment; then, plate them up, spoon the sauce over, and enjoy!

Cucumber Mint Salad

1 whole, large cucumber, ends trimmed

2 roma tomatoes, seeded and diced

2 tbsp minced red onion

1 small clove garlic, minced fine

6 large or 10 small mint leaves, minced, pureed or muddled

3-6 tbsp plain yogurt

salt and pepper to taste

Halve your cucumber lengthwise and slice it into thin but manageable slices. Combine them in a bowl with the onion, garlic, tomato and mint. Then, add in the yogurt and mix until everything is coated. Salt and pepper lightly, tasting as you go along.

Allowing this to sit for an hour or so will deepen the flavors.

Leave a comment

Filed under Ethnic, Seafood, Seasonal, Summer

A gratin is a terrible thing to waste

You guys, I made this for my family for Thanksgiving. And I didn’t even have time to snap a photo of it.

Pheasants, my family loves Thanksgiving. Who wouldn’t? Family gathered, happiness at the holiday season, and the chilly, pre-Christmas nip in the air that brings people together. Also, who could forget the food? Everyone in our family has a dish that they traditionally bring to the literal and figurative table.

My aunt J brings her pineapple-roasted ham, which is a big favorite with most everyone but me (I don’t eat pork.) My GUE (greatest uncle ever!) brings his take on the classic green bean casserole: green beans, mixed into a creamy, mushroom-y base, sprinkled throughout with garlic and bacon. My dad, bless his soul, brings his roast oyster stuffing. You know, if I ever had a last meal, I would definitely request this. It’s smoky, it’s savory, smooth, crunchy, and just delicious. Dad also usually makes the turkey, because he’s a bird-roaster extraordinaire.

As for me?  I’m usually asked to bring a pecan pie. Nothing more. Years back, my GUE was the pecan pie-bringer, because his were always spot-on: crunchy, sweet, and just delightful. One year, however, I challenged him to a pecan pie-making contest, with the winner bringing the pie the next year. I won, but sometimes, now, I wonder if the contest was rigged…

Anyway, this year, being my first year on my own (as an…adult?) I want to bring something killer. Something delicious, heart-poundingly tasty that will make everyone who takes a bite say, “Mmmm….oh yeah,” from sheer happiness. And I know of only one recipe in the entirety of my autumnal retinue that deserves such high honors.

Imagine, pheasants, a gratin: what is it made of? It can be onions, leeks, celery, or any root vegetable you can imagine. But think of this: sweet onions and leeks, layered together with thinly-sliced potatoes and sharp, aromatic onions, layered in a thick, creamy, cling-to-everything sauce. Sage, Pecorino, Parmesan and garlic perfume the whole of it, turning the potatoes into a fragrant, herb-scented dish that you just want to inhale. It makes your entire home smell like fresh cooking and beautiful days in the French countryside.

I made this dish (all for myself…) a month back. It was better than anything I could ever imagine: the cream melded with potato, onion and leek to exalt and praise one another to the fullest extent. It was beautiful. It was amazing. It was heavenly. I guarantee, you will find no other recipe like this. It’s as close to perfect, I think, as a recipe can get.

Make sure that your ingredients are good ones. Regular store-bought rubbed sage will work, but don’t skimp on the cheeses: you want something aged at least a year, although two is better.

Serve it up with grilled or roasted meat, placing the freshly-sliced bits on top so that their flavor and juices can trickle down and beautify the dish further, if that’s possible.

A Very Pleasant Potato, Onion and Sage Gratin

1 russet potato, cleaned

1 cup cleaned, sliced leek

1/2 a medium yellow onion

1/2 a sharp, white onion

1 block of Pecorino

1 block of Parmesan

1/2 c heavy cream

3 tbsp butter

3 garlic cloves

2 tbsp or more rubbed sage

pepper to taste

Using either a mandolin set to its thinnest setting or a sharp knife, slice your onions and leeks as thinly as possibly. Mince the garlic.

Prepare a large bowl with cold, salted water. A large mixing bowl will do. Slice your potato, unpeeled, very thinly with a sharp knife. You want them as thin as you possibly can. Quickly transfer the potato slices into the water to keep them from browning.

Once they’ve all been sliced, line an 8×8 inch pan in foil and spray with Pam; put down a spoonful or two of cream. Sprinkle a little sage over it, and then set down a layer of onion and leek. Set a single layer of potatoes over that, arranging them so they overlap slightly on all edges which touch other potatoes. You want them to be snug, with nary a hole showing through. Spoon on more cream, sprinkle some pepper, sage, and garlic over it all. Using a microplane, grate cheese enough to cover sparsely the cream. Place nine small dots of butter across the whole thing, spacing them evenly. Start again with a thin layer of leek and onion, followed by potatoes, then more cream and spices, followed by cheese.

For your last layer, you want potato on top. Make sure to carefully arrange the slices so that they’re pretty, overlapping, and look good. Spoon the last of the cream over it, sprinkle some sage and garlic, and dot it again with small bits of butter. Grate some cheese over, covering it evenly and carefully. Cover the pan with tin foil.

In an oven preheated to 400°F (204°C) place the dish. Bake for 35 minutes. Halfway through this, take the gratin out, uncover it, and tip the dish slightly to the side. Spoon cream across it, making sure to cover the whole of it with a new layer, then recover it with foil and place it back in the oven.

After the timer goes off, take the foil off, and test the potatoes with a knife or fork. If they give easily and seem done, replace the gratin. If not, bake, covered, for another 10 minutes. Once they’re soft, return the uncovered gratin to the oven. Bake for another 20 minutes, or until the cream is mostly soaked up, the top is golden, and the entire thing smells like heaven. If you like your gratin more brown on top, crank the broiler, and do not leave the oven until they’re as browned as you like them. No one likes a burnt gratin.

Once it’s browned and cooked, take the gratin from the oven. Let it cool for about seven to ten minutes, then dig in. This recipe supposedly feeds four people…but if it only feeds two…who are we to judge? It’s delicious!

Leave a comment

Filed under Autumn, Seasonal

Traditional lamb stew

This is what dreams are made of.

I love lamb. Period. A lot of people don’t like the gamey flavor or the fatty nature of lamb, but I think it’s an absolutely beautiful meat. It’s tender, rich, and oh, so filling. There’s really nothing you can’t do with a few chunks of lamb shoulder and some low, slow cooking.

With that in mind, M gleefully threw a package of mysterious lamb meat into the basket while we were at Ranch 99 the other day. After stashing it in the freezer and mulling the options over for a bit, I looked outside, and we decided that lamb stew would be the best thing for our approaching winter season.

Seriously, pheasants, it’s been hailing like Mother Nature is trying her best to unload all her hail supply before the snow comes in for the season. It’s madness. Pouring rain, driving winds, and snow is predicted for tomorrow…snow. In November. We never get snow in November!

So, tonight, we’re hunkering down with a crackling fire and some piping hot apple cider to enjoy our evening, while this delicious, beautiful stew bubbles away. The best part? This is a crock pot recipe. Life doesn’t get much better than this.

Rainy Day Lamb Stew

1 to 1 1/2 lbs lamb (bone-in, trimmed of fat {which you reserved, yes?})

2 russet potatoes, cut into chunks

1 red onion, sliced thin

4 cloves garlic, sliced thin

4 Crimini mushrooms, quartered

2 carrots, cut into chunks

1 tbsp pepper, divided

1/2 tbsp salt

1 tsp dried thyme

3 sprigs rosemary, minced

1/4 c flour

3/4 c water

1/3 c port wine

In a medium frying pan, place two to three larger chunks of lamb fat on medium.

Place the flour in a small bowl, then mix it with salt and 1/3 tablespoon of pepper. Dredge the lamb in the flour, and, when the fat has adequately melted, crank up the heat to medium-high and sear the chunks, turning them periodically to sear all sides. Transfer the seared pieces directly into your crock pot. While the lamb pieces are searing, add the potatoes, carrots, garlic and mushrooms to the crock pot, using a ladle to mix everything up fairly well.

Once all the lamb is seared and transferred, turn down the heat to medium and place the onions in the pan. Brown them, making sure to get all the pieces well. Once they’re done, pour in the port and deglaze the pan. Add the rosemary and remaining pepper, then cook the wine down until it’s about reduced to half, then add the water, bring to a boil, and pour the onion-wine-water mix into the crock pot. Set it to low and let it go for 8 to 10 hours.

Before serving, skim off any excess fat from the stew.

Serving this with some hearty, crusty bread is good to soak up all the delicious, rich juices. This is definitely a hot, delightful dish for the winter season.

Leave a comment

Filed under Red meat, Seasonal, Winter

Baked tilapia with coconut curry

How delicious does this look? Trust me, it's ten times better than it looks!

As you can tell, I’m a really, really big fan of fish. I love it, and for good reason: it’s healthy, it’s delicious, and there are so many things you can do with it. That being said, I have another fish post for you, and I really think you’re going to adore this one: flaky, moist fish, nestled inside a rich, flavorful coconut curry sauce. I served mine up with some delightful vegetables mixed in to keep it healthy and filling.

Now, before I go any further, I’d like to address tilapia. What is it? Where does it come from? Why does my dad hate it so? Things like that. So, here we are:

Tilapia isn’t one kind of fish, like red snapper or yellowfin tuna. In fact, it’s a lot like tuna or salmon in that a lot of different species of fish fall into the category. Most of the time, though, tilapia is never labeled as anything but “tilapia.” Tilapia, fish of the cichlid family, can be found all over the world, but for all intents and purposes, unless otherwise stated, assume your tilapia comes from China.

Tilapia are notably low in mercury, and are low fat, low calorie, and extremely high in protein. Even better? They’re cheap. Cheap is good for college students!

That being said, a lot of people have a shared memory that dates back to who knows when, which alerts them that tilapia tastes…muddy. Because wild tilapia are bottom-feeding fish, they do indeed have a muddy aftertaste. Farmed tilapia, however, is totally different: it has a cleaner, more cod-like flavor to it. So, for those of you with reservations about tilapia, fear not! It is tasty!

Now, onto greater and tastier things. This recipe, for example. I’d consider it…very Thai-inspired. It’s creamy, smooth and spiced, with hints of coconut and lime. What more could you want in a supper? Serve it over rice for something beautiful, delicious and easy. M has declared that she doesn’t need the lime to make her love the curry, and so she eats hers without. I absolutely adore the very Asian-tropics coconut-lime flavor, so I go nuts with the limes.

This recipe is SO good. I hardly ever condone using caps for emphasis. That’s how good this curry is!

Tilapia with Coconut-Lime Curry 

2 tilapia fillets (approx 3-4 oz apiece), cut into 1/2×1 inch chunks

4 curry blocks (Vermont or Golden House)

1/2 crown of broccoli, cut into small florets

1-2 carrots, cut into coins

1/3 yellow onion, sliced

4 cloves garlic, sliced

1/2 red bell pepper (optional)

1/3 can coconut milk

5 cups fish stock

curry powder, cayenne pepper, garlic powder and paprika to taste

cumin to taste (optional)

1/2 lime, cut into small wedges

So, for starters, you can do this recipe two ways: you can brown all the vegetables to start with, or you can just dump everything in and go. If you’re in a hurry, go with the latter. If not, I’d highly advise going with the browning method. It makes everything tastier and more beautiful in the long run. This curry will, however, be absolutely delectable with the quick method too. If you’re going the recommended route, read on. If you’re doing curry in a hurry, though, skip to the third paragraph.

Set a medium to large pot on medium-high and drizzle in a little garlic oil if you have it, butter if you don’t. Let it melt/bubble, then add in the carrots. Try to keep them all in a single layer, so they get evenly browned. When they’re all golden-brown and beautiful on one side, flip as best you can to the other (don’t sweat it if you only get half flipped.) Brown this side, then transfer the carrots out of the pan. Repeat the process with the garlic and onion, as well as bell peppers, if you’re using them. Transfer everything out of the pan and set it to medium.

Once all of this is done, add in the fish stock and broccoli bits. You can cut them small or large, per your preference, but we prefer them large enough to keep a good bite. Simmer the broccoli for about two minutes, then add the curry blocks, curry powder, cayenne, garlic powder, cumin and paprika. Place the carrots, broccoli, onion and bell pepper back in the pot, and stir. Bring it to a simmer and keep it there, stirring every so often to keep anything from sticking to the bottom.

When the curry blocks have melted and the curry begins to thicken, bring the heat slightly higher. We want thick, rich curry here. Allow it to simmer for another few minutes until it has thickened further, then add half the coconut milk and all the fish.

Taste frequently…you want to personalize the curry to your tastes. If you like it thinner, add more stock or coconut milk. If you want it more coconut-y, add more of the milk. It all depends on your tastes.

Cook, stirring infrequently, for about six minutes, or until the fish is flaky when squeezed between your fingers. Transfer it all to a bowl and serve immediately, with lime wedges.

Served with white or brown rice, this makes for a very filling, surprisingly hearty meal. It’s light and summery in flavor, though, which makes it quite pleasing.

2 Comments

Filed under Ethnic, Seasonal, Winter

Stewed apples, and why you should make them

Note: I have no picture for this, because they literally disappeared as soon as I took them out of the pan. Trust me, these are amazing.

Ahhh, fall. Just thinking of it brings to mind such beautiful sensations: brown, red and gold leaves; the nippy chill of late October and November; cinnamon sticks in apple cider. These are wonderful things, pheasants.

Another wonderful thing about autumn is stewed apples. I love them. Why? They’re sweet (but not too sweet,) soft, cinnamon-y, and fragrant. They go with just about anything: use them to top oatmeal or an English muffin, as a side to ham and eggs in the morning, or on pork chops, with onions. Toddlers and children of all ages love these for their sweet, subtly spiced flavor, as do adults! You can use them as a pre-made apple pie filling, or for apple galette. You can use them to stud an applesauce cake, for the vegans out there. The possibilities are only limited by your imagination!

As for me, I like using mine as a topping for angel’s food cake, with a little whipped cream on top. It’s a delightfully light, deliciously autumnal dish.

The greatest thing in my mind about stewed applies is that they’re easier to make than you could possibly imagine. It just takes a knife, a chopping board and a pan to make them! Cleanup is a breeze.

Stewed Apples

2 1/2 to 3 apples (using apples of different types ups the interest level)

2 tbsp ground cinnamon

1/2 tsp mulling spices (optional), ground

1 tbsp honey

2 tbsp brown sugar (optional)

3/4 c water, divided

Slice the apples thinly; you can peel them if you like, or leave the skin on. Place them in a pan with 1/4 cup of water and sprinkle with some cinnamon. Cover and bring to medium heat. Allow this to cook for about fifteen minutes. When the apples have softened, add in the brown sugar, honey and spices. If you like it more soupy, add in 1/4 cup of water at a time until you reach your desired consistency. If not, leave it as is! Use them to top whatever you feel like. Enjoy!

1 Comment

Filed under Autumn, Seasonal